Thursday, May 5, 2016

Combined Gas Law

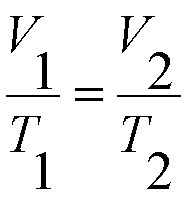
Today's lecture was over our fourth gas law, the combined gas law. The combined gas law uses all of the variables: temperature, volume, moles, and pressure. The formula can be seen in the picture below for the combined gas law.

The formula for the combined gas law:

Combined Gas Law

Wednesday, May 4, 2016

Avogadro's Law

The third gas law we have learned in this unit is Avogadro's law. Avogadro's law has volume and moles of a gas as directly proportional when the temperature an pressure are held constant. As the volume increases, the moles will proportionally increase in order to maintain the constant temperature and pressure.

The formula for Avogadro's Law:

Practice

Tuesday, May 3, 2016

Charle's Law

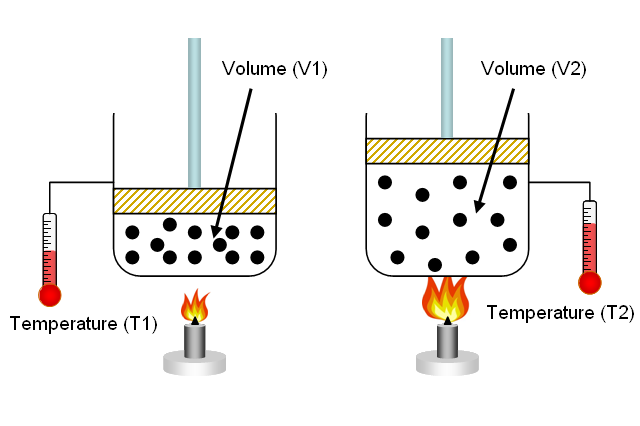
The second gas law we have learned in this unit is Charle's law. In Charle's law, moles and pressure are held constant while temperature and volume change. While temperature increases the volume will also increase, just like when the volume decreases so will the temperature, in order to maintain constant pressure and moles.

Formula for Charle's Law:


Practice Problems
Charle's Law

Monday, May 2, 2016

Boyle's Law

The first lesson of our gas law unit was over Boyle's law. Boyle's law is an inverse relationship between pressure and volume while temperature and moles are held constant. Since Boyle's law is an inverse relationship, as the pressure increases, the volume decreases and vice versa. The formula for Boyle's Law is represented by P1V1=P2V2.


Boyle's Law
Practice Problems

Monday, April 18, 2016

Specific Heat Capacity of a Metal

Today we performed the specific heat capacity of a metal lab. In order to calculate the specific heat capacity with the data. we had to use -MCAT=MCAT. In this lab we were finding the specific heat of copper. Some links that were helpful included:
Specific Heat Capacity Practice
MCAT and Heat
Determining Specific Heat


Tuesday, April 12, 2016

Pop Pop Boat

After making the biodiesel in lab, we are making pop pop boats that will use the biodiesel for fuel. The biodiesel goes in with a candle wick that heats up the engine and creates CO2 that make the boat move in the water. Some helpful links for making a pop pop boat:
Video tutorial
http://www.sciencetoymaker.org/boat/asembCartonl.html

Monday, April 11, 2016

Making Biodiesel

After learning about biodiesel for our biodiesel videos we made biodiesel in a lab. We made the biodiesel using Chick-Fil-La sauce by mixing our oil and base together on a hot plate. After the oil and base had mixed for 25 minutes we removed it and poured it into a plastic cup. The cloudy brown color that formed after mixing ended up splitting into methyl esters and glycerin. The separated put biodiesel will be used to fuel the pop pop boats we are making next.

Make Your Own Biodiesel


Monday, April 4, 2016

Biodiesel Video

In this unit we learned about an alternative source for gas called biodiesel. This alternative fuel has many health benefits over the normal diesel gas that is used to fuel our trucks. These benefits include
To learn more about biodiesel you can watch this video my lab partner and I made: YouTube.

Some links that were helpful in making this video included the following:
http://biodiesel.org/
https://www.fueleconomy.gov/feg/biodiesel.shtml
http://www.afdc.energy.gov/fuels/biodiesel_benefits.html

Monday, March 14, 2016

Polarity and Bonds

Today's lesson was over bond polarity and different types of bonds. Polarity occurs when electrons aren't shared equally between two atoms. When the electrons are shared unequally, one electron has a stronger pull on the bond as a result of differing electronegativities. Between the electrons in an atom, one of three different types of bonds forms: nonpolar covalent, polar covalent, or ionic. Nonpolar covalent occurs when the two electrons are shared equally between the atoms. Polar covalent is the result of unequally shared electrons that cause a partial charge on the atoms. Lastly, ionic bonds are formed when a complete transfer of electrons occurs giving full charges on the resulting ions.


Polarity practice
Polarity

Wednesday, March 9, 2016

Shape of Molecules

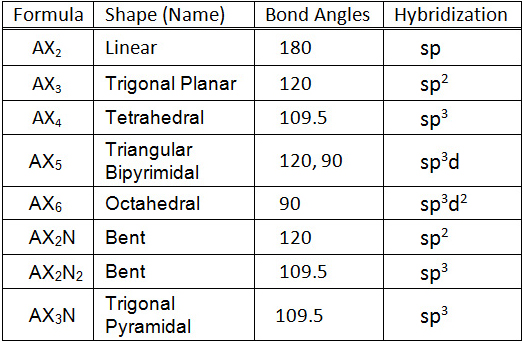
The valence shell electron pair repulsion theory is what is used in order to predict the shape of a molecule. The number of lone pairs and bonded entities present in a molecule will determine it's shape. In particular, we focused on five of the molecular shapes: linear, bent, tetrahedral, trigonal planar, and triganol pyrimidal. A linear molecule has a central atom, consisting of no lone pairs, with two bonded entities. Bent molecules also have two bonded entities but the central atom has two lone pairs. A tetrahedral shaped molecules consists of a central atom with four bonded entities. A molecule without lone pairs on the central atom and three bonded entities is trigonal planar. Lastly, a molecule that is trigonal pyrimidal contains a central atom with two lone pairs and three bonded entities.


We also went over resonance in this lecture. Resonance occurs when a molecule has multiple bonds that can be moved throughout the molecule with the same resulting charges. The picture below shows resonance occurring in an NO3 molecule. Resonance equalizes both the bond strength and the bond length throughout the molecule.


Molecular Shapes Practice
resonance practice

Tuesday, March 8, 2016

Lewis Dot Structures

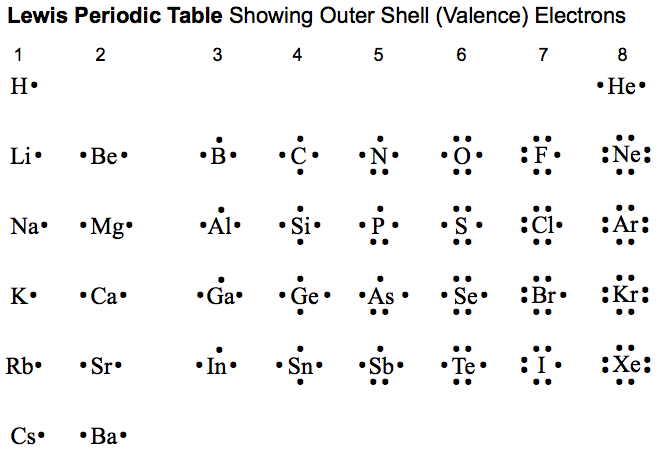
In today's lecture we learned about Lewis Dot Concept that help to show the chemical bonding occurring within a molecule. In order to make a Lewis Dot Concept, a dot must be placed around the element to represent each electron in its valence shell. The dots must be placed going clockwise and only pairing up once four electrons has been exceeded.


One of the rules we learned regarding electrons in the valence shell was the octet rule. The octet rule states that, with a few exceptions, an atom can not have more than eight electrons in it's outer shell. An example of an exception is beryllium. Beryllium, despite the predicted four valence electron, requires six valence electrons in order to be stable.

Practice
Lewis Dot Structures

Tuesday, March 1, 2016

Periodic Trends

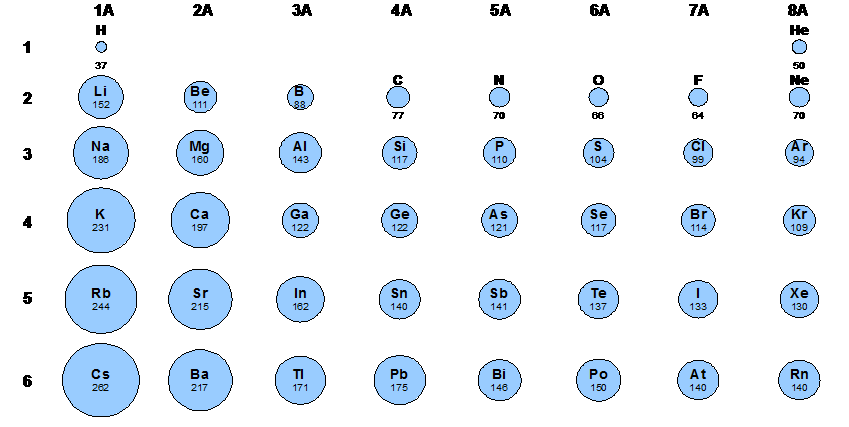
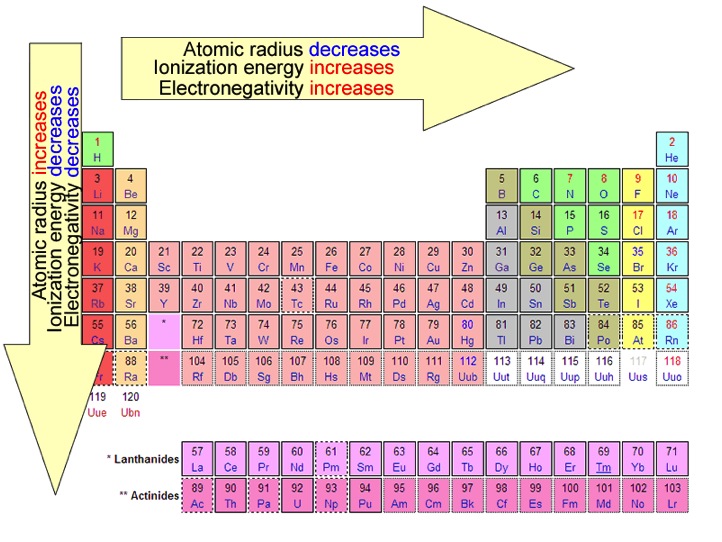
In class today we learned about four different periodic trends. The first periodic trend we learned was atomic size. As you move down a group, the atoms tend to get larger, and as you move across a period from left to right, the atomic size decreases. The first part of this trend occurs because electrons are being added to larger orbitals. The second part of this trend is due to the fact that we are adding protons without much of an increase in shielding. With more protons being added, the nuclear charge becomes greater causing orbiting electrons to pull more toward the nucleus.


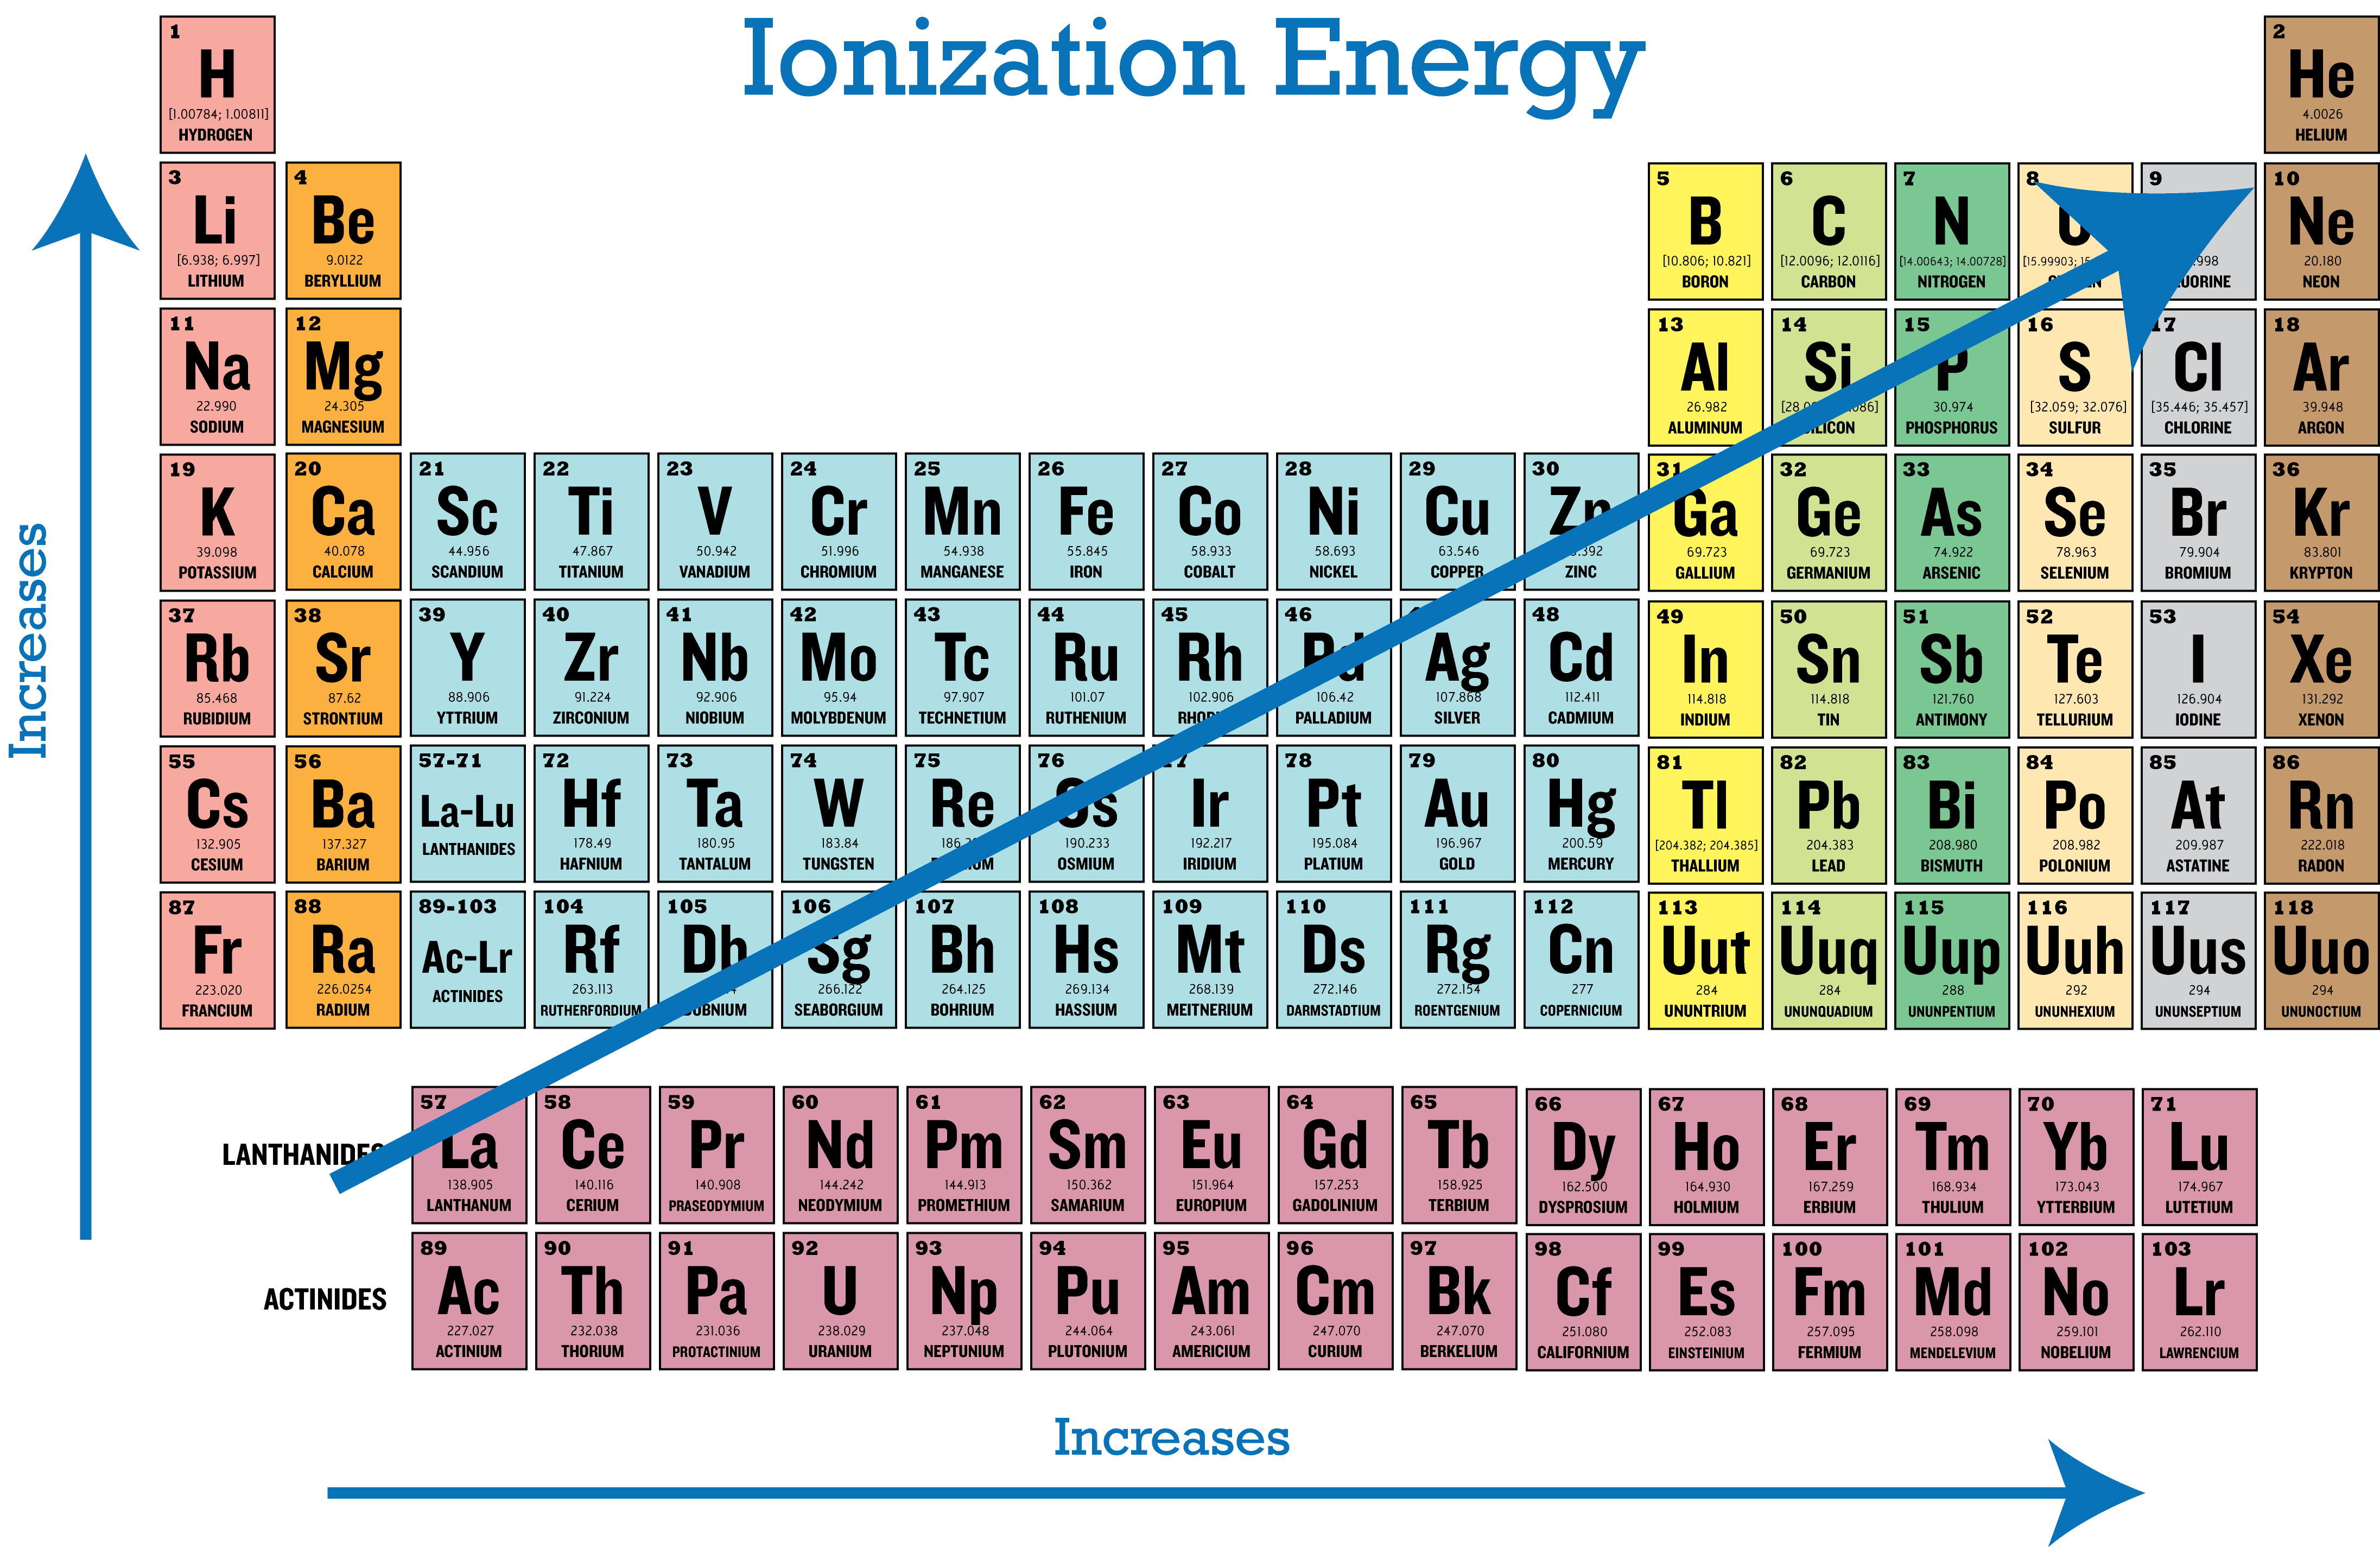
The next periodic trend we learned was over ionization energy. Ionization energy is the energy needed to remove an electron from a gaseous atom. When this electron is removed from the gaseous ion it results in the formation of a cation. Ionization energy occurs each time an electron is removed, meaning their are multiple sets of ionization energies. For this trend, the ionization energy increases as you move up and to the right across the periodic table.


Electron affinity was the next periodic trend we went over in class. Electron affinity is known as the ease with which an electron may be added to an atom, forming an anion. Since some atoms give off energy when an electron is added, some electron affinities are negative. The periodic trend for electron affinity is an increase as you move up and to the right on the periodic table.


The last periodic trend we learned in this lecture was on electronegativity. Electronegativity is the tendency of an atom to draw electrons toward itself when it's chemically combined with another element. An important thing to remember about electronegativity is that there are no units of measurement. The relative trend for electronegativity is an increase as you move up and to the right on the periodic table, excluding noble gases.


http://chemwiki.ucdavis.edu/Core/Inorganic_Chemistry/Descriptive_Chemistry/Periodic_Trends_of_Elemental_Properties/Periodic_Trends

Monday, February 29, 2016

Quantum Numbers

Today in class we learned about quantum numbers. Every set of quantum numbers contains four numbers that represent different values.


  • The first quantum number is the value of the principal energy level, labeled as n

  • The second quantum number is the number that determines the type of sublevel, labeled as l

  • The third quantum number runs from -1 to +1, labeled as ml

  • The fourth, and last, quantum number is spin of the electrons, labeled as ms


Tuesday, February 23, 2016

Spec lab

Today in class we conducted the spec 20 lab using a spectrophotometer. To start out the spectrophotometer was zeroed out using a cuvette with just water in it and adjusting the % transmittance. Once it was zeroed out we placed a cuvette with Cr(NO3)3 in the spectrophotometer and recorded the % transmittance and absorbance. Next we placed a cuvette with CoCl2 and recorded its % transmittance and absorbance as well. We repeated this for many different wavelengths for both solutions.

Thursday, February 18, 2016

Flame Test Lab

Today in class we performed the flame test lab. With this lab we put sticks soaked in different metallic solutions, as well as one solid metal, into the flame of a bunsen burner. By burning these different metals we were able to see a color change within the flame. By recording these colors we were able to determine the wavelengths of the metals including an unknown. In order to determine the unknown metal we had to calculate the energy of one mole per photon of all the metals and compare the numbers. In doing so, my lab partner and I were able to determine our unknown (D) as sodium.


This picture is a little blurry, but you can see the drastic change in color of the flame


Looking at the flame through cobalt glass for metals that turned the flame orange


Wednesday, February 17, 2016

Wavelength Calculations

Today in class we learned how to calculate wavelength, frequency, and energy.

The formula for wavelength is  Î» = c/f


The formula for frequency is f = c/λ


The formula for energy is E= hf


Wednesday, February 10, 2016

Molar Mass of an Unknown Acid

Today my lab partner and I finished our Molar Mass of an Unknown Acid lab. This lab was another titration, however, it was different from the last one in that we didn't know what the acid was in the second titration. Using KHP to standardize, we were able to calculate the molar mass of the unknown acid. After performing the titrations of the KHP and the unknown acid, we then calculated the molar mass of KHP. Once the average molarity was found, we were able to convert it to moles of the unknown acid using the volume of NaOH used, the average molarity of KHP, and the mole to mole ratio. With the moles of the unknown acid we were able to use it as the divider of the mass of the unknown. In dividing the mass by the moles, we were able to calculate the molar mass as 164.76 g/mol.


The unknown acid at its equivalence point

This link helped with the calculations for this lab

Friday, February 5, 2016

Percent Acetic Acid in Vinegar Lab


Over the last few days my lab partner and I have performed the Percent Acetic Acid in Vinegar lab. By standardizing a solution of NaOH with the acid potassium hydrogen phthalate, or KHP, in a titration we were able to determine the molarity of the NaOH solution. Using this standard NaOH solution, we were also able to determine the percent of acetic acid, HC2H3O2 in commercial vinegar.


Adding distilled water to the Erlenmeyer flask in order to dilute the vinegar


After adding two drops of the indicator phenolphthalein we were able to titrate the solution


After all of the titrations were complete, the calculations for the percent acetic acid in vinegar could be made by calculating the average molarity of NaOH and plugging that in to find the molarity of the acetic acid. The molarity could then be multiplied by the molar mass in order to find the mass of solute in the solution. With this mass the percent acetic acid in vinegar can be determined by dividing it by the volume of the solution.

This was helpful in calculating the percent acetic acid in vinegar

Wednesday, February 3, 2016

Titrations

Today's lecture in chemistry was over titrations and equivalence points. A titration is a technique that is used in order to determine the concentration of an unknown acid or base. During the titration, a neutralization reaction, or a reaction that uses equal quantities of acid and base, occurs. A neutralization reaction is reached once the amount of acid and base, with respect to concentrations, are equal and this can be seen when the solution in the Erlenmeyer flask turns a light pink. This change in color is caused by an indicator that is pH sensitive which changes the color once the reaction is complete. An equivalency point in a titration is when the moles that were originally in the solution are equal to the moles after the titration.


A titration is shown in this picture above. the base is in the buret, being kept there by the stopcock. The Erlenmeyer flask contains the acid which has an unknown concentration, this flask is placed right under the buret. The stopcock is then opened in order to allow the base to go into the acid until the color change occurs.

I found this site helpful in order to practice some titration calculations

Friday, January 29, 2016

Hydrogen Concentration, Hydroxide Concentration, pH, and pOH

Today we learned how to convert between hydrogen concentration, hydroxide concentration, pH and pOH. We were able to convert between all of these using one original given value.
 This picture shows how to get from each value to the next in simple problems.


A sample problem from our notes looked like this:
What is the pH of a solution that is 12.5 M HCL?
pH= -log [H+]
     = -log(12.5)
     = -1.097
In order to solve this problem you have to look at the given information. Since we were given the concentration of Hydrochloric acid, it is the same as being given the concentration of hydrogen ions (acids go with hydrogen, bases go with hydronium). Using the chart, we know that in order to get to the pH with the concentration of hydrogen ions we need to do -log [H+].

Other problems require more than one step in order to get the answer. For example, if you are given the concentration of hydronium ions and asked to find the pH, then you need to find the concentration of hydrogen ions, or the pOH first.

This site helped me practice the conversions from this lecture.

Thursday, January 28, 2016

Strength of Acids and Bases

Today's lecture was over determining if the salt produced in an acid-base reaction is acidic, basic, or neutral. In order to determine this we have to look at the strength of the parent acid and parent base. When a reaction includes a strong parent acid and strong parent base, the resulting salt is neutral. Likewise, a weak parent acid and weak parent base produces a neutral salt. On the other hand, a strong parent acid and a weak parent base result in an acidic salt, and a weak parent acid and strong parent base produce a basic salt.


In order to determine if the parent acid and parent base are weak or strong you need to know the rule. For acids, the strength is determined by how many oxygens the compound contains. If the oxygen outnumbers the hydrogen present in the compound, then it is a strong acid. Important exceptions to this rule can be found in the acronym BrINCl, pertaining to acids that contain Bromine, Iodine, Nitrogen, and Chlorine. In order to determine if a base is strong or weak, you need to check if the cation is in group 1 or group 2 of the elements. If the cation is in group 1 or group 2 on the periodic table, then it is a strong base and any other cations mean a weak base.

I found this video helpful in remembering how to determine if the acid and base are strong or weak.

Wednesday, January 27, 2016

Acids vs. Bases

In class today we learned about the differences between acids and bases in physical properties and how they were defined by two different scientists, Arrhenius and Bronsted-Lowery.
Physical properties:
Acids                                    Bases
Taste sour                             Taste bitter
Feel sticky                            Feel slippery
Turns litmus pink                 Turns litmus blue

Arrhenius vs. Bronsted-Lowery

Arrhenius
Acids are those species that produce hydrogen ions in solution (H+)
Bases are those species that produce hydroxide ions in solution (OH-)

Bronsted-Lowery
Acids are those species that donate a proton (H+)
Bases are those species that accept a proton (OH-)

We also learned how to determine the conjugate base and conjugate acid in a reaction. By determining the acid and base using either the Arrhenius or Bronted-Lowery definitions, we can then find its conjugate base and conjugate acid. A conjugate acid is the substance that forms when a proton is added to a base. On the other hand, a conjugate base is the remaining substance when a proton is lost from an acid.

This Link has some helpful practice problems for acids bases.

Thursday, January 14, 2016

Molarity in Stoichiometric Calculations


In class today we learned how molarities can be used in stoichiometric calculations. There are two different ways to look at going through these types of problems.

One of these is using a flow chart:


The other is a systemic approach:


We also learned a few more vocabulary words from this unit:
Titrate- acid-base reaction, driven by the production of water
Endpoint- when the moles of acid equals the moles of base

Some links to practice these problems:
Molarity in Stoichiometry
Stoichiometry with Solutions

Wednesday, January 13, 2016

Murder Investigation Lab

Today in class, my lab partner and I finished conducting the Murder Investigation Lab. On Monday we started by reading about the different suspects for the murder of Miss Scarlet and wrote up a procedure in order to determine who did it. We first did double replacement reactions of potassium iodide and silver nitrate with sodium chloride and sodium carbonate in order to make predictions for the products of mixing the different solutions. Through these double replacement reactions, we were able to predict that the murder weapon was most likely silver nitrate.
By mixing the unknown solution with sodium carbonate, we were able to determine that the murder weapon was in fact silver nitrate based on the reaction forming a solid. We then used the funnel to get the solid that was formed by itself onto the filter paper. After letting the filter paper dry over night, we were able to take the mass of the filter paper with the solid, silver carbonate, that formed. By subtracting the mass of the filter paper from this measurement we can convert the mass of the silver carbonate that formed into moles. We then divide the moles of silver carbonate by the amount of unknown solution used in order to determine the molarity. Doing this, we were able to determine that the murderer was Mr. Green who used silver nitrate as the weapon.


All of the materials we used in this lab.


Taking the mass of the filter paper.


Using a funnel and Urban Meyer flask to separate
the aqueous solution from the solid formed 


The product formed


Links that were helpful in solving the murder:

Friday, January 8, 2016

Aqueous Solutions Lab

Today in class we performed a lab in order to see how the concentrations of each solution change in a serial dilution. We started out with a solution containing 10.0 mL of water and 20 drops of blue food coloring. Between each solution we took 1.0 mL from the previous solution and added 9.0 mL of water, doing this until blue coloring was no longer visible. After diluting the color out of the solutions, we calculated the concentration of solution B, solution C, and solution H. In order to make these calculations we started with the formula (2.0)(1.0) = M2(10.0). As we continue through the solutions in the serial dilution, however, the first number in the formula becomes the result of the last calculation. These calculations show the concentration of the solutions in drops.


Links I found helpful with dilutions:

Dilutions

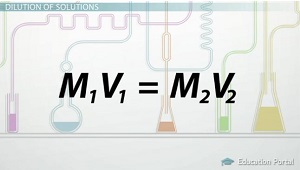
Today in class we took notes over dilutions. A dilution is a series starting with a stock solution and adding water to form a new solution. The amount of solution moved from the stock to the next solution is referred to as an aliquot. In order to solve a problem with dilutions you use the formula M1V1=M2V2. The M stands for molarity, the starting and ending, and the V stand for total volume, staring and ending as well.

A dilution


Formula to solve problems with dilutions